Showing posts with label dessert. Show all posts

Friday, September 14, 2012

Perfect Day with Sticky Date Pudding


My idea of a perfect day would be one that is cold and rainy.  I imagine myself in tartan pyjamas and comfy woolen socks, waking up with messy bed hair. With a cup of hot steaming tea, I creep up to the attic, nestle myself in a big old arm chair and bury my head in a good novel.   Sounds idyllic? Extremely. Especially since I have no attic, no big old arm chair and no tartan pyjamas.   
 
Two things I have though, a good novel and strong, aromatic earl grey tea.  I am currently reading The Poisonwood Bible by Barbara Kingsolver.  I am only a third through the book and it is a wonderful read so far.  Everytime I read a good book, I marvel at the author's writing and creativity.  I have no ambitions on being a writer, but I do wish to possess good writing and story-telling skills.  The ability to arouse emotions and capture interest through the use of words is such a gift.  I will be extremely contented the day I can write like Jane Austen. (This girl can dream.)


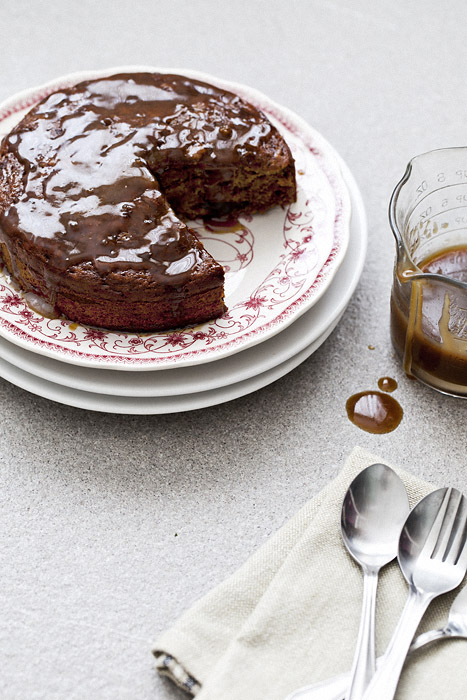
What would make my perfect day even more perfect? A delightful warming dessert to go with my tea.  Now, it would never have crossed my mind that I would be able to make sticky date pudding if not for a friend from secondary school.  I had the notion that it is a luscious and ridiculously complicated dessert which you can only order in restaurants or cafes. Contrary to what I thought, it is relatively painless and easy to make. 
 
A couple of weeks back, my friend had a few of us over at her place.  We all brought our little contributions to the potluck, but she bowled us over with her sticky date pudding.  She is very much a baker as I am a dreamer, so do hop over to her blog to check out her bakes.  She pens the recipes down with so much detail that I would be an absolute clod if I failed at this simple cake.  I have to confess that I bungled at making the sauce.  Mine turned out as butter-scorched instead of butterscotch sauce.  I guess that makes me half a clod.
 
Butterscorched or butterscotch, it was a wonderfully heartwarming treat since the cake is served warm with a generous drizzling of sauce, and usually topped with scoop of vanilla ice-cream. 
 
Imagine.  Cold day, out-of-bed hair, tartan pyjamas, attic, old arm chair, good novel, cup of hot tea and a warm, decadent sticky date pudding served with ice-cream. Utter bliss.  My perfect day.
 
 
Vanilla ice-cream with butterscotch sauce.
When I am too slothful to bake, ice-cream is a good enough to make my perfect day.
 
 
Sticky Date Pudding (Recipe adapted from here)


Cake:
270g pitted dates (I used King Soloman Deri Dates)
1 1/4 cup water
1 tsp bicarb soda
60g unsalted butter, chopped
1 1/4 cup all purpose flour
1 tsp baking powder
1/4 teaspoon salt
100g brown sugar
2 eggs
1 tsp vanilla essence

Preheat oven to 180C.

1. Place dates and water in a pot, bring to boil on high heat.
2. Add bicarb soda and unsalted butter. Remove from heat and cool for around 10 min.
(be careful, the mixture will bubble up when soda is added, make sure the pot has sufficient height)
3. Blend the mixture with a hand blender (I used my food processor)
4. Add the eggs and vanilla essence and blend to combine, short few pulses is sufficient.
5. Mix all flour and sugar in a separate bowl and ensure that sugar has no clumps.
6. Add the wet mixture into the dry mixture and fold in to combine.

Pour into lined 8-in pan and bake for 55 to 60 minutes. I tent it after 30 minutes to prevent a charred top.
(If using muffin cups, bake for 25 - 30 minutes)
I made half the above portion in a 15-inch pan and baked for 40 minutes.


Butterscotch sauce:

180g thickened cream
160g brown sugar
150g unsalted butter
1 tsp vanilla extract
1/2 teaspoon sea salt

Place all ingredients in a pot and bring to boil. Simmer at low heat for around 5 minutes, constantly stirring the mixure until it thickens.

(I scorched my sauce!  It turned out fairly dark. So be careful here and put it over really low heat)
Once cake is done, cool for 10 minutes. Poke numerous holes in the cake and drench the sauce over cake. This ensure that the dates become sticky with the caramel sauce.

Drizzle more butterscotch for that additional buttery sweetness.
Serve warmed with a scoop of vanilla bean ice cream for best enjoyment.
The sauce can be refrigerated and stored for up to 2 weeks. Reheat before use.
Puddings can be refrigerated for up to 3 days and warm before serving.


Monday, January 30, 2012

Celebrating his 49th with a Chocolate Cheesecake


Yesterday was my hubby's birthday.  His 49th. This might sound strange, but I am proud of his age.  He is 18 years my senior.  Everyone gets all surprised when they discover our age difference, and I get a kick out of it.  Right from the start I've always described our relationship as surreal, and for me, it's sort of a fairytale that we ended up together (Alright, don't roll your eyeballs..  I know I'm no Princess Diana).  I think the beauty of our marriage is that we are so different, and yet, so similar, at the same time.

I love that we are both from two different generations.  It's always interesting when he recounts his childhood days, a world which I will never ever get to experience.   I find it funny when he gets all exasperated teaching me how to do things (I admit I'm a pampered brat) and telling me to put all my things back in place after using them (Yep, I have a tendency to leave all my stuff lying around the house.  Over the years, I kind of gathered that I'll be terrible at committing crime cos I'll probably leave a trail of evidence from the crime scene right to my doorstep.).  There are times when I wished I was 10 years older and met him earlier.  But then again, due to the unpredictability of human nature, I might not be attracted to the younger him.   I convince myself again and again during those times that things are perfect as they are now.


This is (if I recall correctly) the 5th birthday I'm spending with him and the first time (this is definite) that I baked a birthday cake for him.  Had a go with Nigella's chocolate cheesecake which I baked late Saturday night.. Both of us had to stay up past midnight.. and I had to bring the cheesecake into our air-conditioned room to spend the night with us as it didn't cool fast enough to be placed in the refrigerator.. Talk about bad-planning. 

Verdict for this 1st baked birthday cake.. The texture of the cake was great.. but it wasn't sweet enough for the both of us.  I realised that it was my mistake (I can never find fault with Nigella!).  I used chocolate with 70% cocoa. So that probably made the cake more bitter than desired. 

Well.. he was kind enough to finish his slice without much complaints.. and encouraged me to try baking it again..


To my life partner and best friend.. 
Happy Birthday! 
Looking forward to spending many more birthdays with you. 


Chocolate Cheesecake (adapted from Nigella)

Cheesecake base:
125g graham cracker crumbs
60g butter
1 tbsp cocoa

Cheesecake filling:
175g bittersweet or semisweet chocolate, chopped small
2 1/2 cups cream cheese
3/4 cup superfine sugar
1 tablespoon custard powder
3 large eggs
3 large egg yolks
2/3 cup sour cream
1/2 teaspoon cocoa, dissolved in 1 tablespoon hot water
Sauce:
3 ounces bittersweet chocolate, finely chopped
1/2 cup heavy cream
1 teaspoon dark corn syrup
Special equipment: 9-inch springform pan

Directions 
Preheat the oven to 350 degrees F.

To make the base, process the graham crackers to make rough crumbs and then add the butter and cocoa. Process again until it makes damp, clumping crumbs and then tip them into the pan. Press the crumbs into the bottom of the pan to make an even base and put into the freezer while you make the filling.

Put a kettle on to boil.

Melt the chocolate either in a microwave or double boiler, and set aside to cool slightly.

Beat the cream cheese to soften it, then add the sugar and custard power, beating again to combine. Beat in the whole eggs and then the yolks, and the sour cream. Finally add the cocoa dissolved in hot water and melted chocolate and mix to a smooth batter.
Take the springform tin out of the freezer and line the outside of the tin with a good layer of cling wrap, and then another layer of strong foil over that. This will protect it from the water bath.

Sit the springform tin in a roasting pan and pour in the cheesecake filling. Fill the roasting pan with just boiled water to come about half way up the cake tin and bake in the oven for 45 minutes to 1 hour. The top of the cheesecake should be set, but the underneath should still have a wobble to it.

Peel away the foil and cling film wrapping and sit the cheesecake in its tin on a rack to cool. Put in the refrigerator once it is no longer hot, and leave to set, covered with plastic overnight. Let it lose its chill before unspringing the cheesecake to serve.

To make the chocolate sauce: very gently melt the chopped chocolate, cream and syrup. When the chocolate has nearly melted, take off the heat and whisk it to a smooth sauce. Let it cool a little, and pour it over the chocolate cheesecake on its serving plate.


Wednesday, January 25, 2012

Pear Galette


I still shudder at the thought of making pastry.  I've tried making pastry 3-4 times so far, and I can't say that I've truly succeeded in making good pastry.  The mixing is rather easy (everything gets thrown into the food processor)... The part that gets me all flustered is the pastry rolling.  I don't know whether it's due to the hot and humid weather in Singapore, but the pastry dough goes soft really quickly whilst rolling. 

Well, this is precisely why I decided to make a galette - it's much much quicker to make since there's no need to line the dough in a pie tin (a very painstaking process).  And also because I found these pretty red anjou pears in the supermarket.  Call me a country bumpkin, but I've never eaten a red anjou pear before..So I just had to buy them.. Besides, I thought they were lovely to photograph.. so even if the pie didn't work out, it wouldn't be so bad.

I wasn't too happy with my pie crust this time around. I fumbled again during rolling... I was worried that the butter might have melted, so I didn't roll the dough thin enough at the edges.  

Well..I'll probably continue to make galettes till I've attained a perfect pie crust.  Practice practice practice. ha!(can't imagine how long that will take me!)


Pear Galette Recipe (adapted from Sweet Paul Online Magazine)
serves 5-6


1 single crust of pie dough (recipe below)
4-5 pears peeled, halved and cored (I used only 2.5 pears)
1/4 lemon
1 tsp cinnamon
1 tsp cardamon
1-1/2 tbsp of flour and extra for dusting
1/3 cup sugar
1 tbsp butter
drizzle of honey (I used agave nectar)


- Preheat oven to 425F (220*C)
- Roll dough out on a floured surface.  Around 1/8" thick and roughly a 12" circle
- Transfer to a parchment lined baking sheet. Allow to rest in the refrigerator
- Slice pears.  In  a large bowl, toss them with a squeeze of lemon, spices, flour and sugar.
- Arrange fruit mixture in the centre of the dough, leaving a 2-3" border
- Fold dough over fruit, pleating all around.
- Dot centre with butter and drizzle with honey.
- Bake for about 35 minutes.  The crust will be golden brown and the fruit will be bubbling (strangely, my pears didn't bubble :( )
- Add another drizzle of honey when serving.


Pie Crust Dough
Makes 2 Single 9" pie crusts of 2 galettes
2 cups all purpose flour
1/4 tsp salt
1 cup (227g) cold unsalted butter, cut into chunks
1 egg whisked with enough cold water to make 1/3 cup


- Add salt, flour, butter to bowl of food processor fitted with blade attachment. Process until butter resembles small peas. (Use the pulse setting)
- Add 1/4 cup of egg and water combo and pulse until dough starts to get together.  If it's too dry, you can add a touch more water.
- Turn out onto a floured surface
- Pull together and divide into 2 discs
- Wrap individually into 2 cling wraps.  Refrigerate to rest for at least 1 hour.